Books, Miscellaneous

A New Year, a New Beginning…

The first few days of a new year feels like a break. An opportunity to pause, think, recharge and realign to life’s long-term destinations. In the race that’s called “life”, it’s good to have a lull, a moment of silence, a moment of reflection in the continuum of hours and minutes and seconds that rush through. Speaking from experience, knowing our flaws always helps, as long as we recognize them; and to recognize them, we just need two ingredients: a moment of reflection, and an open mind.

This past year has been very rewarding for me, both in terms of personal and professional enrichment. I have been really fortunate to know some people directly or indirectly whose clear thinking, mentorship and sometimes sheer genius deeply affected my thought process and outlook. Such were some books, which I am extremely glad I got my hands on. Here they are:

Books

  1. Blockchain by Mark Gates — I read this book mainly because I was feeling left out on the cryptocurrency buzz. I really wanted to know, in a very simple and non-technical way what it all means and why is it so popular, and if it is worth its salt. This book was excellent. It has a very lucid dialect. Every chapter has a summary which outlines the whole chapter so one can skip a chapter or two if it goes into too much detail. Overall, an excellent guide if you are new to blockchain technology.
  2. Clean Architecture, The Clean Coder, and Clean Code by Robert C Martin – I had heard about these books a lot, but never got a chance to go through them all. And now that I have read them, all I can say is — these are books that every programmer should read once a year. Just like a good literature has many layers of understanding that unfolds every time you read them, these books reveal new insights and open new doors every time you pick them up!
  3. Functional Swift by Chris Eidhof, Florian Kugler, and Wouter Swierstra, Advanced Swift by Chris Eidhof, Ole Begemann, and Airspeed Velocity, Core Data by Florian Kugler and Daniel Eggert – All of them are the most practical and in-depth Swift and Core Data related books I have ever got the chance to read. Amazing examples and sample code. The best thing about these books is — they are full of best practices and an in-depth explanation of the same. Anyone who wants to know those topics in depth will be deeply enriched by them.
  4. A Mind of Numbers by Barbara Oakley, Ph.D. – This book is about learning. Lots of insights on the inner workings of the human brain, how it processes information and how it learns. They are full of wonderful examples from eminent people. If our brain is what is a sword to a warrior, this book teaches how to be the master of the sword, rather than being its slave.
  5. Leonardo the Vinci – Notebooks — Interesting one don’t you think? I have always been intrigued by this Renaissance polymath. If you are wondering what I learned or even understood by reading those optically transformed backward scribbles of the legendary genius, let me confess – hardly anything. But one important lesson I learned was the importance of documenting one’s work. That gave me the idea of making a Developer’s Journal. This is not a new concept, smart developers have been documenting their work ever since the dawn of time. I have two journals, in one I note down all the new learnings (I post them on this blog sometimes if they are big enough and interesting enough), but the other one is more interesting. I write down all the problems I encounter there – and how I fixed it. You wouldn’t believe how much insight it provides on one’s learning curve. It also becomes a very interesting read, once it is long enough to have forgotten how did I fix that pesky problem that kept me up for two nights!

At the very end, I’ll share with you a piece of thought. Nothing is permanent. But nothing is transient either. Think about an excavation of historical importance and obscure wall carvings. Who created them, who wrote them? A person just like you and me (maybe by order from some higher authority) who lived thousands of years ago. Little did he know, thousands of years later, the world would know about his work, no matter how insignificant it seemed then. Similarly, what we do now, echoes in eternity. The work you do today would probably be uncovered thousands of years from now. Wouldn’t you want them to be intrigued by your craftsmanship? Let’s keep that in mind and let’s amaze the future humankind.

With that last thought, I bid you goodbye for now and wish you have a wonderful new year and may this new beginning renews and rejuvenates you in your journey of attainment of your true potential. Bon voyage!

Miscellaneous

Machine Learning with CoreML

Rise of CoreML

We iOS Developers are a lucky bunch – apart from the usual holidays in December, we enjoy a special Christmas every June – thanks to the World Wide Developers Conference organized by Apple. 2017 was no exception either. So when Apple unwrapped the boxes for us – out came the new HomePod Speaker, the new beast called iMac Pro, Mac OSX High Sierra – everything was awesome! Then there were the toys for developers. I probably have been a very nice guy all year because it was a pleasant surprise for me when Apple revealed their new CoreML – machine learning integration framework – because out of professional curiosity I have been dabbling with Machine Learning for the past few months. So having the opportunity to implement the power of machine learning in iOS – I could not wait to get my hands wet! Here’s an outline of what I learned:

What is Machine Learning

Before we jump right down the cliff, let’s discuss a little about that what’s beneath.

You see, when a human child puts her first step at the doorway of learning, she can not learn by herself. Instead, she needs her hand carefully held by the teacher, and with intensive guidance, she is steered along the path of acquiring knowledge. As she learns, she also gains experience.

Experience.

The trusted friend who would, one day, take the job off her teacher’s careful hands and become her lifelong guide and companion – growing together as she passes through the oft-perilous ways of life.  And exactly there, dear reader, a machine have differed from a human being thus far. A machine could be taught, but it could not teach itself – until – machine learning evolved. Machine Learning provides the experience factor to the intelligence system of a machine which is also known as Artificial Intelligence. It’s the science of getting computers to act without being explicitly programmed.

A computer program is said to learn from experience E with respect to some class of tasks T and performance measure P if its performance at tasks in T, as measured by P, improves with experience E.
 – Mitchell, T. (1997). Machine Learning. McGraw-Hill. p. 2. ISBN 0-07-042807-7.

Types of Learning

Based on algorithms used for training a machine to gain experience, Machine Learning can be grouped into two major categories – Supervised Learning and Unsupervised Learning. Supervised Learning is where a machine is trained with a complete set of labeled training data and outcomes. On the other hand, unsupervised learning is where the machine can not be trained with labeled training data. Using supervised learning a machine can either solve a classification or a regression problem. On the other hand, a machine can solve a clustering and some other types of problems using unsupervised learning. Following are some examples of the problems:

  • Classification: The machine is given a dataset and based of specific parameters it classifies them into different categories. For example: Based on the size and shape of a tumor, the machine can classify a tumor to be malignant or benign.
  • Regression: Based on various parameters, like product price, demand, distribution and other factors, based on historical data, a machine can predict the profit for the current or future years.
  • Clustering: The best example of clustering should probably be the Google News. It uses an algorithm to group news of same topic and content and show them together. Pattern recognition plays a key part in clustering solutions.

Once such an algorithm is generated, a model can be generated which enables a machine to refer to it to make further predictions, inferences and deductions. Machine Learning tools can generate such a model, but once generated they can not be used in iOS apps as is. They need to be converted to Xcode supported .mlmodel format.

CoreML

Apple provides the link to a few open source CoreML models that solve some classification problems like detecting the major object(s) in a picture or detecting a scene from a picture.

However, apart from these, any machine learning model generated by any machine learning tool can be converted into a CoreML model using CoreML Tools – that can be used in the app.

Core ML lets you integrate a broad variety of machine learning model types into your app. In addition to supporting extensive deep learning with over 30 layer types, it also supports standard models such as tree ensembles, SVMs, and generalized linear models. Because it’s built on top of low level technologies like Metal and Accelerate, Core ML seamlessly takes advantage of the CPU and GPU to provide maximum performance and efficiency. You can run machine learning models on the device so data doesn’t need to leave the device to be analyzed.

Using the CoreML model, and Vision framework, it’s really easy to build an iOS app that – given a photo – can detect scenes or major objects from that and display. I won’t go into the irrelevant details of building this app from scratch but rather would discuss the heart of the application – the fun part – and it’s just a few steps.

The Photo Recognition App

I will assume that the app is setup to provide an image, by either picking a photo from the native photo picker or by taking a photo with the camera.

Step 1. Now the first step would be to download a machine learning model from Apple’s website and include it in the app. Here I am using Inceptionv3 model listed in Apple’s website. This seems to be a very good model with much better accuracy than the others – although a bit heavy in size. Now Xcode does some heavy lifting for you. As soon as the model is added, Xcode generates a model class named after the model name. To see it, just highlight the model in Xcode files navigator:

Screen Shot 2017-07-11 at 11.26.25 AM

In the next steps we would refer to this class as Inceptionv3.

Step 2. Now it’s time for some code. Import Vision and CoreML frameworks which will aid us in our journey. Then implement the following code.


import Vision
import CoreML
//…
guard let model = try? VNCoreMLModel(for: Inceptionv3().model) else {
fatalError("can't load CoreML model")
}

view raw

Model.swift

hosted with ❤ by GitHub

Here we create an instance of the VNCoreMLModel class for the CoreML model Inceptionv3. It’s sometimes recommended to initialize this early so that it’s faster once the image is selected for recognition.

Step 3. Now we need to create a VNCoreMLRequest which would query the MLModel with our image to find out what it is.


let request = VNCoreMLRequest(model: model) { [weak self] (request, error) in
guard let results = request.results as? [VNClassificationObservation],
let topResult = results.first else {
fatalError("Result not in correct format")
}
DispatchQueue.main.async {[weak self] in
self?.predictionLabel.text = "\(topResult.confidence * 100)%
chance to be \(topResult.identifier)"
}
}

view raw

Request.swift

hosted with ❤ by GitHub

Here, first we create a VNCoreMLRequest and specify a completion block once it finishes execution. The completion block just takes the first result from the prediction set received as an array of VNClassificationObservation class. As I discussed before, classification is one type of observation. There are other types of observations like clustering, regression. Notice that, VNClassificationObservation is a subclass of VNObservation.

The VNCoreMLRequest uses a VNCoreMLModel that is based on a CoreML based model to run predictions with that model. Depending on the model the returned observation is either a VNClassificationObservation for classifier models, VNPixelBufferObservations for image-to-image models or VNMLFeatureValueObservation for everything else.

Step 4. We are almost there. The last and final step is to actually executing the request. A job well suited for the one and only VNImageRequestHandler.


let handler = VNImageRequestHandler(ciImage: image)
DispatchQueue.global(qos: .userInteractive).async {
do {
try handler.perform([request])
} catch {
print(error)
}
}

view raw

Handler.swift

hosted with ❤ by GitHub

All the code listed above can be included in one method and once it is executed, the answerLabel prints the name of the major object on the picture along with the accuracy.

Img

A note on accuracy

From the above screenshot, it might appear that the world of machine learning and prediction is all rainbows and unicorns like this, but in reality it’s far from that. Machine Learning is still in it’s infancy and has much room for improvement. As for the iOS app, it all depends on the model used, and its very easy to miss the optimal sweet spot and instead under-train or overtrain the model. In case of overtraining, the models start focussing on the quirks of the training set more and hence it’s accuracy gets diminished.

Conclusion

Using a CoreML model and Vision framework to leverage machine learning to create perception about the outside world opens up endless possibilities. Once the machine recognizes an object, it’s probably the next obvious step to respond to it. In iOS 11, ARKit provides Augmented Reality – one of many options to do something with this new super power the iPhones have got. I intend to touch up on that in my next post. Meanwhile, have fun and learn how to train your machine!!

All copyrights of images belong to their respective owners.

iOS Development

Swift 2.0 and Unit Testing

Preface

As we mature, as programmers and professionals, we see things differently. Our approaches and perspectives change and our paradigms shift. We start weighing things on a different scale, silently laughing at our follies we made in adolescence. I admit, initial days of my journey as a programmer, I used to program like an artist. I would make a basic structure first, then perfect it slowly towards the requirement by debugging and thus narrowing the gap between the current and target state. It had been working fine, but the biggest problem with that approach was — debugging almost always takes up more effort and time than actual development. Though I love debugging, but also, in many cases, I was having to change a lot of code to make things optimized, which could be avoided by a preplanning the coding approach which is evidently lacking in the current modus operandi.

Then I got introduced to Test Driven Development (TDD) approach. I wouldn’t say that I was in love with the approach at the first instance and started following that everywhere — no. Apart from the fact that like most daytime programmers I do not have the luxury to follow any new approach as soon as I encounter, I actually was skeptic about the approach and never thought it to be practical. However, I decided to give it a fair chance and tried it out on a couple of home grown projects, and I liked it. Lot less debugging, hugely less worry about changing code and its impact, and lot less effort to develop.

Today’s post is not about TDD, but actually about Unit Testing. In the past days, writing a unit test for the piece of code written by the developer seemed impractical and frown upon by the developers and major part of unit testing was done manually by the developer before handing over to the QA team. However, as I mentioned before, the programming community is now matured enough not to ignore the boons of unit testing. Apple’s flagship IDE Xcode comes with XCTest unit testing framework bundled within. We will dive into the framework and testing techniques in this post.

What is Unit Testing

In the term Unit Testing, unit represents the smallest possible testable bit of code written. It might be a method, a class or a whole functionality, based on the viewpoint of the programmer. A test is a piece of code that exercises the code written to make an app, a library or a functionality and provides a status of pass or fail based on some given criteria. The pass and fail of a test is derived by checking for correct state of certain objects that are expected to change their states after an operation is done, or whether a piece of code throws an exception based on a specific set of data that passes through it where it is supposed to throw the exception. There are performance tests too, which measures the execution time of a set of code block and determines the pass or fail status based on preset benchmarks.

Different types of Unit Testing

As the unit testing frameworks matured, more and more types of unit testings were made possible. Along with the functional testing framework, non-functional unit tests such as Performance Testing were made possible in the unit testing frameworks. In Xcode 6, Apple introduced performance testing capabilities in it’s XCTest framework. In Xcode 7 they introduced UI Testing. We will dive into each type of testing one by one and see how this can be done.

Setting up Unit Test Project

I will use Xcode 7.0 beta (7A121l) for demonstrating the Unit Testing. When a project is created using Xcode it also sets up a Unit Testing project with it if “Include Unit Tests” checkbox is checked.

Screenshot_8_10_15__11_36_PM

Once the project is created, you will find a Test folder is created alongside with it too. Now we will see how we write tests. TDD approach talks about writing the test cases before you even start writing code. This approach asks you to write test cases for the code that does not exist and run the test case which fails. Then write the code to make it pass. However, here, for the sake of simplicity and for the sake of the very basic nature of the post, I will show a basic test scenario based on the code already written.

Main Project

So, I will start with a very basic project I created just for the demonstration purpose of this article called BookCatalog. The project is actually a slight variation of the time stamp sample project you get when you create a master detail project for the first time. So you have a plus button at the top and tapping that the table gets populated with name of books from an array which contains names of books and their authors.

Simulator_-_iPhone_6_-_iPhone_6___iOS_9_0__13A4305g_

So to demonstrate how tests work, I take an example of a method called "populateBookModel". The method looks something like below:


let books = ["The Great Gatsby by F. Scott Fitzgerald",
"The Prince by Niccolo Machiavelli",
"Slaughterhouse-Five by Kurt Vonnegut",
"1984 by George Orwell",
"The Republic by Plato",
"Brothers Karamazov by Fyodor Dostoevsky",
"The Catcher in the Rye by J.D. Salinger",
"The Wealth of Nations by Adam Smith",
"For Whom the Bell Tolls by Ernest Hemingway",
"The Grapes of Wrath by John Steinbeck",
"Brave New World by Aldous Huxley",
"How To Win Friends And Influence People by Dale Carnegie",
"The Rise of Theodore Roosevelt by Edmund Morris",
"Dharma Bums by Jack Kerouac",
"Catch-22 by Joseph Heller",
"Walden by Henry David Thoreau",
"Lord of the Flies by William Golding",
"The Master and Margarita by by Mikhail Bulgakov",
"Bluebeard by Kurt Vonnegut",
"Atlas Shrugged by Ayn Rand",
"The Metamorphosis by Franz Kafka",
"Another Roadside Attraction by Tom Robbins",
"White Noise by Don Delillo",
"Ulysses by James Joyce",
"The Young Man’s Guide by William Alcott",
"Blood Meridian, or the Evening Redness in the West by Cormac McCarthy",
"Seek: Reports from the Edges of America & Beyond by Denis Johnson",
"Crime And Punishment by Fyodor Dostoevsky",
"Steppenwolf by Herman Hesse",
"East of Eden by John Steinbeck",
"Essential Manners for Men by Peter Post",]
var bookObjects = [AnyObject]()
func populateBookModel () {
books.map {
(book: String) -> String in bookObjects.append(Books(bookName: book.componentsSeparatedByString(" by ")[0], author: book.componentsSeparatedByString(" by ")[1]))
return book
}
}

The above code actually parses the above array, populates the Books model.


class Books {
let bookName: String
let author: String
init(bookName: String, author: String) {
self.bookName = bookName
self.author = author
}
}

view raw

Books.swift

hosted with ❤ by GitHub

Test Project

So, I would like to test this populateBookModel method to check whether the books are getting populated nicely. So, I would create a file in the test project with a name which signifies the class I am going to test. This file will contain all the tests for all the methods/functionalities I like to test from the MasterViewController class. Now I have to decide how to verify that the method actually executed without any problem? If you examine the code of the MasterViewController as displayed above, you will find that I actually take the books from books array and populate them into bookObjects array. So, if I check the count of these two arrays and they match, that would indicate that the population was successful. To achieve this, I write the following test —


import XCTest
@testable import BookCatalog
class BookCatalogTests: XCTestCase {
func testpopulateBookModel() {
let masterVC = MasterViewController()
masterVC.populateBookModel()
XCTAssert(masterVC.bookObjects.count == masterVC.books.count, "Book objects are \(masterVC.bookObjects.count) and books are \(masterVC.books.count) in number")
}
}

If you execute the above test, the test will pass as the count of the books array matches with the count of bookObjects. So, the above test says that the population was successful.

Sample Project

I have put together a project which shows how to setup your unit testing project and write unit tests. All the examples in this article can be found there. You can grab the project at this location.

Conclusion

Unit Testing is a vast subject. With this article, I have touched the tip of the iceberg — because I wanted to write down my learnings as fast as possible. As I go on exploring more I will post more articles on unit testing. I hope the post was helpful and interesting to you and you will love writing unit tests as much as I do now. Please feel free to post comments and suggestions as always!

iOS Development

Asynchronous Networking Approaches…

How should Asynchronous Networking be handled? This is quite a common question in various places, starting from interviews to forums like Stackoverflow. Yet, this is not a question to be answered in a sentence. There are several ways with their own strengths and weaknesses. This article is a humble effort to outline them all.

NSURLConnection Approach – New approach

The most modern of the approaches would be to use sendAsynchronousRequest:queue:completionHandler:
Following is an example of the usage of the method:


[NSURLConnection sendAsynchronousRequest:request
queue:[NSOperationQueue mainQueue]
completionHandler:^(NSURLResponse *response, NSData *data, NSError *error) {
[self doSomethingWithData:data];
}];

This approach has the following benefits:

  1. This does away with the repetitive code that handles intermediate results
  2. Race conditions are avoided which sometimes occur if using NSURLConnection delegates, as some of the part of the delegate gets prematurely released. The block here is retained
  3. In case of multiple asynchronous request, the code for handling each of the response is cleanly separated and thus less chance of mixup

But all these good things comes with a price tag.

  • You lose some control over the operations. Imagine the scenario when you will need to cancel the download of a large chunk of data. In the above implementation, there is no way you can actually cancel the request without leaking memory.

You can probably try cancelling the NSOperation within the queue that is sent as a parameter to the method, but that does not necessarily cancel the operation. It merely marks the operation as cancelled so that when you query the isCancelled property of the operation you get back a positive. But you will have to cancel all your activities yourself based on this isCancelled flag.

  • As stated in the first beneficial point, you can not handle intermediate results.
  • With this approach when a request is made, it either fails or succeeds, and it fails even for authentication challenges.

NSURLConnection – Traditional Approach

Then there is the traditional approach where we implement the NSURLConnectionDelegate methods and initiate the request with NSURLRequest. A quick example follows:


-(IBAction)didPressConnectButton:(id)sender {
NSURL *url = [NSURL URLWithString:@"http://someurl.com/api?parameter"%5D;
NSURLRequest *request = [[NSURLRequest alloc] initWithURL:url];
self.connection1 = [[NSURLConnection alloc] initWithRequest:request delegate:self];
}
#pragma mark – NSURLConnectionDataDelegate Methods
– (void)connection:(NSURLConnection *)connection didReceiveResponse:(NSURLResponse *)response {
self.responseData = [[NSMutableData alloc] init];
}
– (void)connection:(NSURLConnection *)connection didReceiveData:(NSData *)data {
[self.responseData appendData:data];
}
– (void)connectionDidFinishLoading:(NSURLConnection *)connection {
if ([connection isEqual: self.connection1]) {
NSData *data = self.responseData;
//Do something with the data
}
}
#pragma mark – NSURLConnectionDelegate Methods
– (void)connection:(NSURLConnection *)connection didFailWithError:(NSError *)error {
//Handle error scenario
}

view raw

Traditional.m

hosted with ❤ by GitHub

One benefit of using the traditional approach with NSURLConnection is that you get to handle authentication challenges through delegates. Though handling authentication challenges properly might be a lengthy and difficult, but it is nonetheless possible.

Following is the delegate method which handles authentication challenge:


– (void)connection:(NSURLConnection *)connection willSendRequestForAuthenticationChallenge:(NSURLAuthenticationChallenge *)challenge {
}

But if there are multiple requests, then in the authentication challenge handler it becomes difficult to understand for which request the authentication challenge is thrown.

A Better Approach – NSURLSession

As we discussed both of the above approaches has their pros and cons. So, Apple has come up with an approach which takes the best of both. This is the approach with NSURLSession

Block based approach


NSString *imageUrl = @"http://images.apple.com/v/watch/c/images/nav_sport_large.jpg";
NSURLSessionConfiguration *config = [NSURLSessionConfiguration defaultSessionConfiguration];
NSURLSession *session = [NSURLSession sessionWithConfiguration:config delegate:self delegateQueue:nil ];
NSURLSessionTask *downloadTask = [session downloadTaskWithURL:[NSURL URLWithString:imageUrl] completionHandler:^(NSURL *location, NSURLResponse *response, NSError *error) {
UIImage *downloadedImage = [UIImage imageWithData:[NSData dataWithContentsOfURL:location]];
dispatch_async(dispatch_get_main_queue(), ^{
self.imageView.image = downloadedImage;
});
}];
[downloadTask resume];

view raw

DownloadTask.m

hosted with ❤ by GitHub

Delegate based approach


– (void) downloadImage {
NSString *imageUrl = @"http://images.apple.com/v/watch/c/images/nav_sport_large.jpg";
NSURLSessionConfiguration *config = [NSURLSessionConfiguration defaultSessionConfiguration];
NSURLSession *session = [NSURLSession sessionWithConfiguration:config delegate:self delegateQueue:nil ];
NSURLSessionTask *downloadTask = [session downloadTaskWithURL:[NSURL URLWithString:imageUrl]];
[downloadTask resume];
}
-(void)URLSession:(NSURLSession *)session downloadTask:(NSURLSessionDownloadTask *)downloadTask
didFinishDownloadingToURL:(NSURL *)location
{
// use code above from completion handler
}
//For progress indication
-(void)URLSession:(NSURLSession *)session downloadTask:(NSURLSessionDownloadTask *)downloadTask didWriteData:(int64_t)bytesWritten totalBytesWritten:(int64_t)totalBytesWritten totalBytesExpectedToWrite:(int64_t)totalBytesExpectedToWrite
{
NSLog(@"%f / %f", (double)totalBytesWritten,
(double)totalBytesExpectedToWrite);
}

view raw

Delegate.m

hosted with ❤ by GitHub

Finally, the best approach in my humble opinion, would be to use AFNetworking, or RESTKit. There are other third party APIs too, like MKNetworkKit etc. I have not used MKNetworkKit by Mugunth Kumar, but the other two are really good when it comes to asynchronous networking and a myriad of other related features.

With AFNetworking, the above task can be performed as:


NSURLSessionConfiguration *configuration = [NSURLSessionConfiguration defaultSessionConfiguration];
AFURLSessionManager *manager = [[AFURLSessionManager alloc] initWithSessionConfiguration:configuration];
NSURL *URL = [NSURL URLWithString:@"http://example.com/download.zip"%5D;
NSURLRequest *request = [NSURLRequest requestWithURL:URL];
NSURLSessionDownloadTask *downloadTask = [manager downloadTaskWithRequest:request progress:nil destination:^NSURL *(NSURL *targetPath, NSURLResponse *response) {
NSURL *documentsDirectoryURL = [[NSFileManager defaultManager] URLForDirectory:NSDocumentDirectory inDomain:NSUserDomainMask appropriateForURL:nil create:NO error:nil];
return [documentsDirectoryURL URLByAppendingPathComponent:[response suggestedFilename]];
} completionHandler:^(NSURLResponse *response, NSURL *filePath, NSError *error) {
NSLog(@"File downloaded to: %@", filePath);
}];
[downloadTask resume];

AFNetworking also allows to track progress with multipart request. The following is an example of an upload task with progress indicator:


NSMutableURLRequest *request = [[AFHTTPRequestSerializer serializer] multipartFormRequestWithMethod:@"POST" URLString:@"http://example.com/upload&quot; parameters:nil constructingBodyWithBlock:^(id<AFMultipartFormData> formData) {
[formData appendPartWithFileURL:[NSURL fileURLWithPath:@"file://path/to/image.jpg"] name:@"file" fileName:@"filename.jpg" mimeType:@"image/jpeg" error:nil];
} error:nil];
AFURLSessionManager *manager = [[AFURLSessionManager alloc] initWithSessionConfiguration:[NSURLSessionConfiguration defaultSessionConfiguration]];
NSProgress *progress = nil;
NSURLSessionUploadTask *uploadTask = [manager uploadTaskWithStreamedRequest:request progress:&progress completionHandler:^(NSURLResponse *response, id responseObject, NSError *error) {
if (error) {
NSLog(@"Error: %@", error);
} else {
NSLog(@"%@ %@", response, responseObject);
}
}];
[uploadTask resume];

view raw

UploadTask.m

hosted with ❤ by GitHub

iOS Development

Apple Watch Glance and Inter Device Communications…

As a continuation to the series of articles I have been writing about Apple Watch and WatchKit (which you can find here and here), today I intend to discuss about the “Glance” feature of Apple Watch. But as Christmas is drawing near, and Mr. Clause would like me to do so, in addition to Glance, I’ll give you something extra. Very recently, Apple has revealed a new feature to WatchKit. The feature is inter device communication, which bridges the information gap between the iPhone device and Apple Watch.  I’ll cover that too!

So, as an aggregation measure and in the urge to know everything right now and here, which is an instance of an insatiable inquisitiveness inherent in invariably all individuals such as I, this article enjoys the daylight.

Glances

Glances are a summary view of the actual application running in the Apple Watch. You can very well compare them with the live tiles in Windows Phone. In Apple’s own words —

Glances are a browsable collection of timely and contextually relevant moments from the wearer’s favorite apps. Individually, a Glance is a quick view of your app’s most important content.

Keeping that intention in mind, Apple has put severe restrictions to the design of Glances. The first of them is —

  1. Template Based: they are template based. So, there is no way other than following where Apple wants you to put your views.
  2. Single Action: Another one is, they only can host one single action. If the user taps on the Glance, the Watch App launches.

Inter Device Communication

It would have been really good if the communication was really two way, in an impartial manner. Unfortunately, iPhone turned out to be too shy to start the conversation with Apple Watch. And in such a scenario, Apple Watch does just what a guy/girl does when trying his/her luck with their shy counterpart, it takes the initiative and approaches. Hopefully, if s/he wishes to do so, iPhone can reply back. Romantic, isn’t it?

How to Glance (and not watch!)

Today, I will not delve deep into step by step tutorials. Because, making an Apple Watch app with Glances is really easy and only takes a heartfelt tick on the tick box that says “Include Glance Scene”.

GlanceHowTo

I will rather explain what I want to present to you in terms of source code, which as usual is uploaded in Github (MIT license).

Application Overview (my big idea)

My idea of utilising both Glance and Inter Device Communication is as follows:

Let me tell you a secret, I love loans. There is no other thing in the world that has such a tremendous power to provide you endless sleepless nights (for two) and at an extreme, even the unique opportunity to be homeless again, only at the nominal cost of a little temporary happiness! That’s why, I would like to make a banking app which lets you view your loan balance, and unlike other selfish banks, encourages you to pay back the loan and be out of that debt soon (so that you can borrow an even larger amount soon enough!)

The original iPhone application shows your loan account number and a pie chart that depicts how much you have paid back and how much outstanding amount you have to pay further.

MainScreen

This information will also be available in my Apple Watch app. In the Glances view, the user can see the graph in the iPhone app which urges her to make the whole green.

MainWatch

And here will be the Glance view for the data.

Glance

The graph is generated using the famed CorePlot. Apple Watch unfortunately does not have the guts to use CorePlot yet, so it will have to suffice with a PNG representation of the graph view which will be thrown to the Watch App upon request.

iPhone App – with all her beauty, waits for her knight in shining armour

Our iPhone application has a JSON file, which contains the following data. Of course In the real life scenario all these data would be coming from the server locked in encryptions with keys thrown in the water.

   { 
      "LoanAmount": "70000",
      "Outstanding": "20000",
      "Paid": "50000",
      "AccountNo" : "3423847289",
      "NextInstallment": "01/01/2015"
    }

The iPhone app reads the data and generates the pie chart using core plot API. Finally the graph is converted into png image and is saved in the document directory.

What Apple (Knight) Watch does

The Apple Watch have the ability to invoke the parent app. So, when the user taps on the “Refresh” button, the iPhone app launches and generates the graph.


- (IBAction)refreshGlance {
    [self openParentAppToRefreshGraph];
}

-(void) openParentAppToRefreshGraph {
    [WKInterfaceController openParentApplication:[NSDictionary dictionaryWithObjectsAndKeys:@"ImageName", @"chartImage.png", nil] reply:^(NSDictionary *replyInfo, NSError *error) {
        NSData *pngData = replyInfo[@"Image"];
        NSArray *paths = NSSearchPathForDirectoriesInDomains(NSDocumentDirectory, NSUserDomainMask, YES);
        NSString *documentsPath = [paths objectAtIndex:0]; //Get the docs directory
        NSString *filePath = [documentsPath stringByAppendingPathComponent:@"chartImage.png"]; //Add the file name
        [pngData writeToFile:filePath atomically:YES];
    }];
}

Her silent reply…

In the callback to the Apple Watch, the image generated from the graph is sent back to the Apple Watch for display.

    // Called when the application is about to terminate. Save data if appropriate. See also applicationDidEnterBackground:.
}

-(void)application:(UIApplication *)application handleWatchKitExtensionRequest:(NSDictionary *)userInfo reply:(void (^)(NSDictionary *))reply {
    
    [[NSNotificationCenter defaultCenter] postNotificationName:@"WatchKitNotification" object:nil];
    
    NSArray *paths = NSSearchPathForDirectoriesInDomains(NSDocumentDirectory, NSUserDomainMask, YES);
    NSString *documentsPath = [paths objectAtIndex:0]; //Get the docs directory
    NSString *filePath = [documentsPath stringByAppendingPathComponent:@"chartImage.png"];
    NSData *pngData = [NSData dataWithContentsOfFile:filePath];
    
    NSDictionary *response = @{@"Image" : pngData};
    reply(response);
 
}

Phew!… It’s a Yes !!

Once the data is received, Apple Watch then saves the image in the documents directory. So, when user goes to glance, the new updated graph is ready.

- (void)awakeWithContext:(id)context {
    [super awakeWithContext:context];

    NSArray *paths = NSSearchPathForDirectoriesInDomains(NSDocumentDirectory, NSUserDomainMask, YES);
    NSString *documentsPath = [paths objectAtIndex:0]; //Get the docs directory
    NSString *filePath = [documentsPath stringByAppendingPathComponent:@"chartImage.png"];
    NSData *pngData = [NSData dataWithContentsOfFile:filePath];
    [self.glanceImage setImageData:pngData];  
}

Conclusion

And the Apple Watch and iPhone lived happily ever after (for many many years).

Hope you liked the story. The code is uploaded in Github, you can grab it here. You’re welcome! 🙂

iOS Development

Apple Watch Notifications

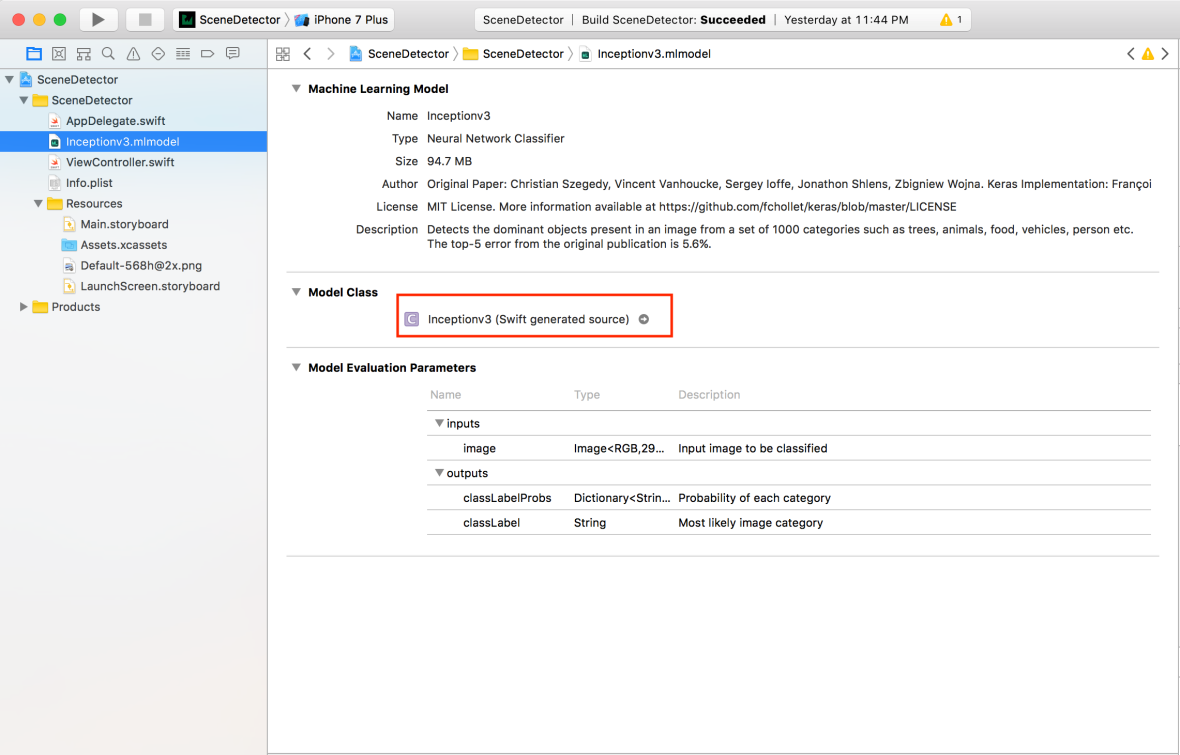
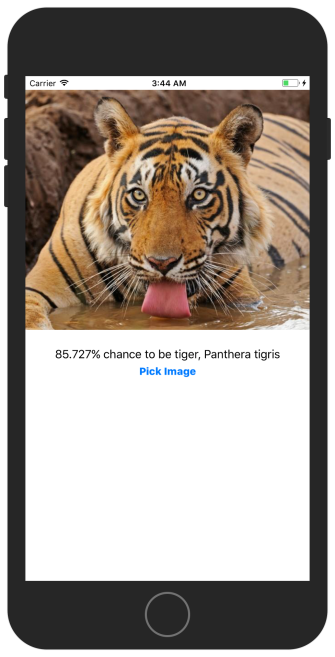
Remote and local notifications are not at all a new thing. From the very day – the 17th of June, 2009, they were introduced, they have always been, arguably, the most favourite mechanism to deliver messages to the user. The messages has ranged from proximity alert to a store, new update to an app, directional instructions to illegal promotions.

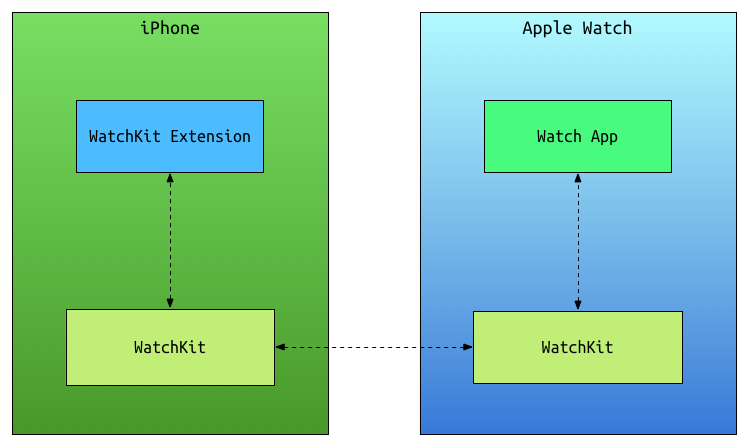
 But in Apple watch, notifications take a new dimension. From the way the notifications are designed for  Watch, it appears quite evident that Apple has spent considerable amount of energy to make them better and more meaningful. Following is the flow showing how a notification is presented to an  Watch user.

  1. According to the  Watch Human Interface Guidelines and WatchKit Programming Guide, when an app running in the iPhone receives a notification, iOS decides where to show the notification. Though this is kind of a vague statement, but as of now there seems to be no control over this even if we specifically need the notification to be shown in  the  Watch. Also, I could not find any information on how iOS decides to show the notification where it decides to show. Guess we’ll have to wait a bit for to know that.
  2. If the notification is sent to the  Watch, the user feels a subtle vibration on his wrist or a mild audio cue based on the notification’s payload.
  3. Alarmed, as the user raises his hand, a very minimalistic screen is presented which is called Short Look interface. This is an immutable, non-scrollable screen that conveys the user the most important information about the notification. iOS designs them based on a predetermined template and present on the screen. This is  Watch’s interpretation of your everyday notification, with just a title provided by you in the notification payload.
  4. All work and no play makes Jack a dull boy. Who understands this better than Apple? So, here is the shining playful part. The customisable, scrollable, actionable notification screen. After the Short Look notification is displayed, if the user continues to keep his hand raised (in the hope that something else will happen…soon…well..anytime now…), or taps on the Short Look interface the Long Look interface is displayed.

Apple has given you freedom within the aesthetic boundary to design the Long Look interface. You can add buttons and graphics and customise the behaviour when the user taps on it.

But what happens if you don’t provide the Long Look interface? Well, Apple has a backup plan. iOS displays a default interface with the app icon, title string and alert message. Tapping on it launches the app.

OK, so let’s not allow Apple to have all the fun and design our own Long Look interface!

A Long Look interface has three major parts —

  • The Sash at the top of the screen — this includes the title string and the icon of the app
  • The content — this is your playground. Add any graphics and buttons
  • The dismiss button — this is always present, added by the iOS, and dismisses the notification once tapped

 In the Sash section, as a third party developer, you have basic freedom. You can change the tint color and title of the notification.

In the content, you have much more liberty. You can modify and design the label to show your notification message. You can add buttons, but not directly. All the buttons should come in a specific format through a JSON payload that will invoke the notification. The SDK already generates one  such JSON payload file while creating  notification scene for testing purpose.

Screen Shot 2014-12-04 at 02.29.48Changing the alert, title and category controls what the notification screen will display.

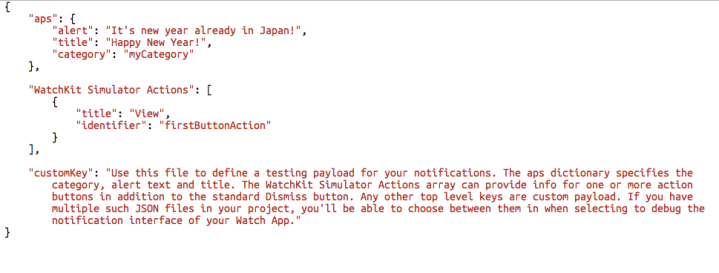
As you see above, in the “WatchKit Simulator Actions” array is holding a collection of buttons in the form of dictionary which can be used to add/remove/modify buttons in the notification.

To create a notification, create a new project and add a new Watch Target as discussed in my previous post. This time keep the “Include Notification Scene” checkbox selected to include our notification interfaces.

Screen Shot 2014-12-04 at 02.35.44

Include all the necessary app icon images. Apple could not think of any more, so they want only the following few dimensions :

  • 29 X 29
  • 36 X 36
  • 58 X 58
  • 80 X 80
  • 88 X 88
  • 196 X 196
  • 172 X 172

Xcode will generate two extra interfaces for you in the interface.storyboard (other than the usual screen for your watch app) inside your project. They are —

  • Static Interface — A notification interface that can be configured design time. It is mandatory to keep this interface in your app bundle.
  • Dynamic Interface — A notification interface that can be decorated with dynamic data in runtime. This is not mandatory.

When running the app, iOS first looks for Dynamic Interface. If not found it falls back to Static Interface. If the static interface suffices your n0tification requirement, it is safe to delete the dynamic interface. Also, it can be explicitly instructed not to show the dynamic interface.

For the time being, lets change the Static Interface. What we are trying to do here is —

  •  show a notification stating that Japan is already enjoying the new year with an action button.
  • Tapping on the “View” button the app will launch and
  • display the current time in Tokyo

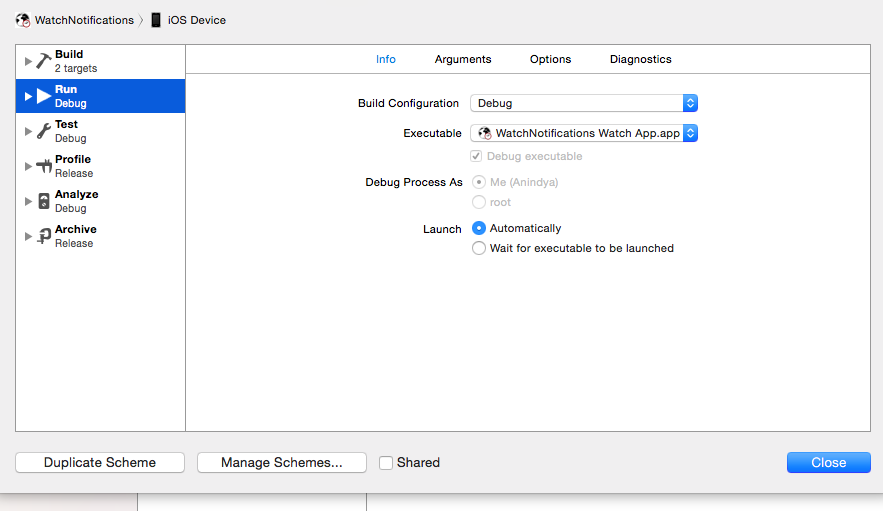
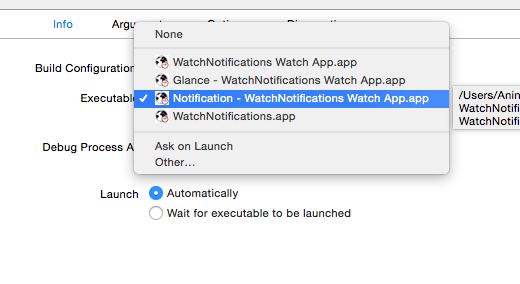
Now create a new scheme for notification and map the notification executable to that scheme to view the  Watch notification in iOS simulator.

Screen Shot 2014-12-04 at 03.07.07

Screen Shot 2014-12-04 at 03.07.28

Screen Shot 2014-12-04 at 03.15.01

If you build and run your app now, the default static notification screen will show. Take into notice that the message text, button text everything is being pulled from the JSON file that is included in the bundle.  you can try changing them to see if the change takes place in the notification.

Before we do some action, lets modify the JSON file to suit our needs by changing title, message and category. (Screenshot above) Lets name them as follows:

&quot;aps&quot;: {
        &quot;alert&quot;: &quot;Japan is already celebrating new year!&quot;,
        &quot;title&quot;: &quot;Happy New Year!&quot;,
        &quot;category&quot;: &quot;NewYear&quot;
    }

Also, in the Interface.storyboard file, select the “Category” under Static Notification Interface Controller and in the attributes inspector, change it to “NewYear”. Make sure that the category names are matching in the JSON as well as in the storyboard. Otherwise, the app will not build at all.

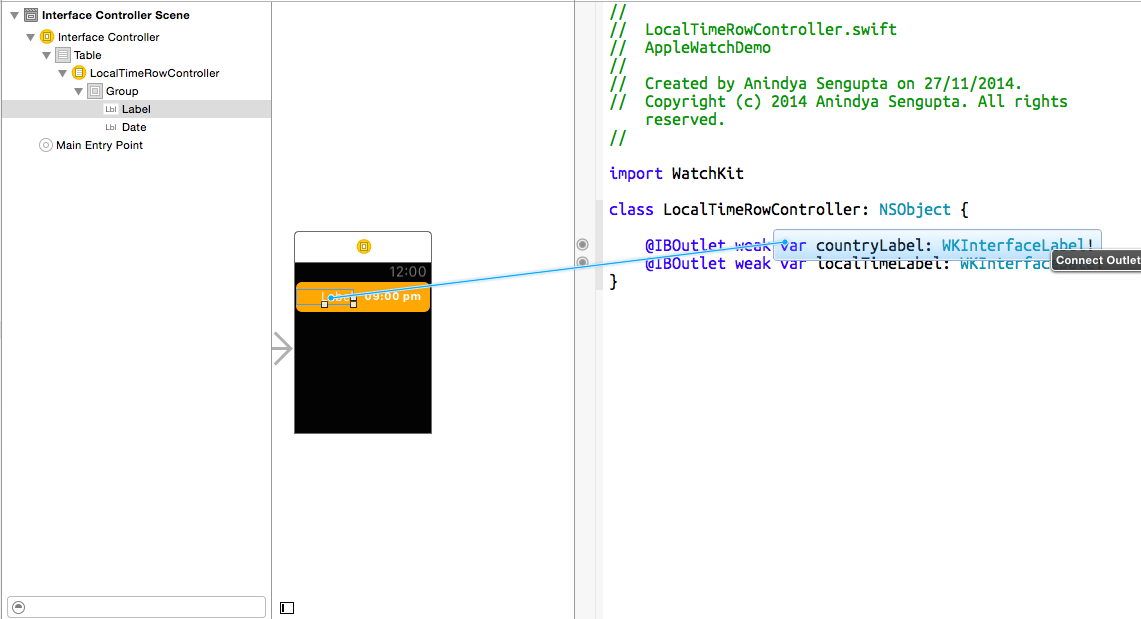
Now we want the user to tap on the button and make something happen. Let’s add a date label to the interface of the  Watch app which will display the date based on the timezone set. Hook it to the InterfaceController as dateLabel.

Inside the Interface Controller, we can handle the notification like so:

@IBOutlet weak var dateLabel: WKInterfaceDate!
override func handleActionWithIdentifier(identifier: String?, forRemoteNotification remoteNotification: [NSObject : AnyObject]) {

        if let id = identifier {
            if id == &amp;quot;firstButtonAction&amp;quot; {

                var plistKeys: NSDictionary?
                var timeZones: NSDictionary?

                if let path = NSBundle.mainBundle().pathForResource(&amp;quot;Timezones&amp;quot;, ofType: &amp;quot;plist&amp;quot;) {
                    plistKeys = NSDictionary(contentsOfFile: path)!
                    timeZones = plistKeys![&amp;quot;TimeZones&amp;quot;] as NSDictionary?
                }

                if let dict = timeZones {
                    NSLog(&amp;quot;%@&amp;quot;, dict.valueForKey(&amp;quot;Tokyo&amp;quot;) as String)
                    dateLabel.setTimeZone(NSTimeZone(name: dict.valueForKey(&amp;quot;Tokyo&amp;quot;) as String))
                }

            }
        }

    }

Now build and run the app. At first it will show your designed screen. Tapping on the dismiss button dismisses the notification screen. Tapping on “View” button shows Tokyo’s current time.

Right now, the app is showing the static notification screen. If you want to show a custom dynamic notification with data that can only dynamically be passed into the interface, we need to modify the “Dynamic Interface”. The Dynamic Interface is controlled by the NotificationController.swift. If you navigate there, you will find two functions commented out

override func didReceiveRemoteNotification(remoteNotification: [NSObject : AnyObject], withCompletion completionHandler: ((WKUserNotificationInterfaceType) -&gt; Void))

override func didReceiveLocalNotification(localNotification: UILocalNotification, withCompletion completionHandler: (WKUserNotificationInterfaceType) -&gt; Void)

Uncomment the

didReceiveRemoteNotification(remoteNotification: [NSObject : AnyObject], withCompletion completionHandler: ((WKUserNotificationInterfaceType) -&gt; Void))

and make sure that the completionHandler is set to be .Custom

override func didReceiveRemoteNotification(remoteNotification: [NSObject : AnyObject], withCompletion completionHandler: ((WKUserNotificationInterfaceType) -&gt; Void)) {
        
        // Tell WatchKit to display the custom interface.
        completionHandler(.Custom);
    }

Now if we make any modification to the dynamic interface, you will see that the dynamic interface with its changes is being shown as the notification screen. This is because, as I mentioned earlier, iOS searches for the custom dynamic interface first. If it can not find one, then only it loads the static one.

Try changing the .Custom to .Default to see your static interface.

You can download the whole project from Github — https://github.com/an-indya/WatchNotifications

Hope you will enjoy building for  Watch as much as I did. I will try putting in something more as I learn. Please do leave a reply and feel free to share if you like!

Hope this helps!

iOS Development

Watch and Learn!

“Tell me and I forget. Teach me and I remember. Involve me and I learn”
— Benjamin Franklin


It’s a very interesting time for iOS developers, not quite like ever before. We have a new faster, cleaner and better language and a new device to develop for. So, I decided to learn them together. You have guessed it quite right, this post is an effort to  assimilate my knowledge on Swift and WatchKit. I really got inspired by
Natasha the Robot, who has recently posted a series of excellent posts describing in depth about making  Watch apps. Her blog is worth a visit. Also she has a guest post in NSHipster as well! So, coming back to the point, I intend to follow her loosely as I embark on the journey to learn WatchKit and perform the same exercise in Swift. There is no better way to learn other than doing it ourselves, is there?WatchKit was released a few days back, and its probably the beginning of a new era. It is almost like the time when the first iPhone Development Kit was released for registered Apple developers. Though this time it’s a little disheartening to understand the limitations and constraints imposed on the  Watch apps, but knowing Apple, I am sure it won’t last long. Its a really clever move from Apple to make the Watch extremely lightweight and thus very much battery efficient. Still I believe – it’s just a matter of time before Apple finds a way to improve the hardware and battery life of the watches to make them self reliant and sufficient to host their own native standalone apps.

Before we start, here is something on NDA on WatchKit in case you are wondering:

A Note on NDAs – while an Apple developer account with NDA is required to download Xcode betas and actually use WatchKit, all of the reference documentation is publicly available at this link.  The programming guide is similarly available publicly here. Since all of this information is public, we don’t have to worry about NDA trouble.

http://www.willowtreeapps.com/blog/developer-perspective-on-apples-watchkit/


Architecture

Before we delve into coding, let me explain the architecture of  Watch apps. This will help us understand the apps better, let us take informed design decisions and help cultivate useful and innovative ideas leveraging the  Watch and its capabilities.

The  Watch apps are nothing but extensions of app extensions and are designed the same way as the recently introduced extensions are designed. So, the WatchKit apps will have 2 parts —

  1. The application extension which will be running on a paired iPhone
  2. The app installed in the  Watch

As a basic principle of App extensions in Apple platform, a container app and an app extension can not interact directly, however, they may do so indirectly through intermediator. The intermediator would be WatchKit.

All the heavy liftings, like – implementation of business logic and data manipulation etc. would be done in the app running on the iPhone, whereas the Watch app will contain the main story board and other UI resources. These resources will form the outward interface of the Watch app which will be powered by the iPhone app. In a simpler sense, the Watch app would be the face and the iPhone app will be the brain behind it.

WatchKit Architecture
Watch App Architecture

In the above diagram, the left hand side box represents the iPhone and the right side box  Watch. As the smaller boxes depict, the app extension (WatchKit Extension) runs on the iPhone and interacts with the WatchKit. The Watch App contains all the UI elements required for displaying the app and these resources can not be changed in run time. So, if you need to show a custom view at some point of time in the life cycle of the application, you would need to plan ahead and keep a hidden view already there in the Watch app which you can unhide and display.

So, when the user of the  Watch touches a notification or views a “glance” in the Watch App, the Watch invokes the app installed in it and opens up the appropriate storyboard scene and UI resources. The app then requests the WatchKit extension running on the iPhone through the WatchKit framework to respond to the events and updates the UI based on the response received from it. This communication takes place for all the user events like touch and other gestures registered by the Watch app. The code executed in the iPhone app is responsible for updating the UI of the Watch app and perform any necessary operations including generating dynamic content and sending over to the Watch app for display.

For the following codes we assume that Xcode 6.2 (beta at the time of writing this) or above is installed.

Hello, World!

I will stick to the tradition and start by creating an  Watch application which says to the wearer — “Hello, World!” Then we shall move on to create a little more complex and interesting things.

  • Create a new project in Xcode with “Single View Application”. Lets name it as “AppleWatchDemo”. Make sure you select the language as “Swift”, we need to learn Swift too — isn’t it?

 Screen Shot 2014-11-26 at 22.07.12

  • Add a new target by selecting “Edit –> Add Target” or by selecting the project file and then in the properties window, expand the target dropdown and select “Add Target”.
Screen Shot 2014-11-26 at 22.10.49 Screen Shot 2014-11-26 at 22.11.25
  •  In the template selection window, go to “Apple Watch” section and well, you know what template to choose here. 🙂

Screen Shot 2014-11-26 at 22.20.28

  • Click on next and if you want, uncheck the “Include Notification Scene” and “Glance Scene” checkboxes.

Screen Shot 2014-11-26 at 22.24.59

  • Click on “Finish”. As alway Apple promises, you already have a Watch App ready to be deployed. Only it’s blank. So let’s put something in it to show. We are going to show “Hello, World!” in a UILabel.
  • Now, go to the Interface.storyboard file of the Watch App. You will see an interface of the Watch is present there. At the top right there will be a time label, one of those fancy labels Apple has created which make you life easier by showing the time, or displaying count down timer. It’s a watch after all, why shall we be surprised? 🙂 As you can clearly guess, if you run the app now, it will show a small screen with current time at the top right corner.

Screen Shot 2014-11-26 at 22.56.21

  • Now lets add a label. Drag and drop a UILabel into the window. To centre align — select the label and go to the Attributes Inspector. Under “Position” section change both the drop downs to “Centre”. This is how the interface design works in  Watch. There is no fixed frame, no autolayout. Everything you layout on the screen will be laid out horizontally side by side. Now change the text to read “Hello, World!”.

Screen Shot 2014-11-26 at 23.08.51

  • And…you are done. Select the target to be Watch App and then run the project. You will see the iPhone simulator and the Watch Simulator launch together and the Watch display “Hello, World!”
  • Congrats! You have made your first  Watch App!

Delving Deeper in to the world of the clocks and watches

But we are serious developers, why should we be happy with just a “Hello World” app? We need more, isn’t it? Let’s build some tableview goodness.

Along with many interesting features, Apple has also provided the Watch with some extra UI elements which are enhancements of previous primitive ones. Timer and Date Labels are two of them. When a date label is displayed, it shows the current time at your convenient format, without having you to write a single line of code for it. Leveraging them we are going to build a world clock (watch!) application which will help us explore the tableview as well as the Date Labels. The final product will look something like this —

Final

As you can see, I am sitting in London and the current time is being displayed at the top right corner of the watch which is 9:43 PM.  The other cities are also displaying their respective times.

  • So, lets remove the Label displaying “Hello, World!” and add a Table to the Interface.storyboard, the main story board file of your watch app. You will see a Table Row Controller getting added to the Table automatically.
  • So, these will be the template for our rows. Lets add a Label to show the city name and a Date Label for the times. Vertically centre align the labels and set appropriate width the same way we did for Hello World label.
  • Set the Format of the date to be custom — hh:mm a which will display similar to 09.00 pm. Set the font to be “System Bold” and of size 13. Also, for the City label, let’s make the font to be System and size to be 13 as well.
  • The attribute inspector also provide lots of attributes to play with, tinker to your heart’s content!


Screen Shot 2014-11-27 at 21.49.18Screen Shot 2014-11-27 at 21.49.01
  • Finally, some code. Create a new file in the WorldWatch WatchKit Extension and name it LocalTimeRowController.swift. Make it inherit from NSObject and import WatchKit into it.
    import WatchKit
    class LocalTimeRowController: NSObject {
    @IBOutlet weak var countryLabel: WKInterfaceLabel!
    @IBOutlet weak var localTimeLabel: WKInterfaceDate!
    }
  • Now lets add a yellow background colour to the row and set its height to be “Fixed Height” and make it 30 Screen Shot 2014-11-27 at 22.14.06
  •  Move over to your Interface.storyboard in the WorldWatch Watch App and select the Table Row Controller in the left hand pane. Change the class name for the controller to be LocalTimeRowController.Screen Shot 2014-11-27 at 22.41.31
  • Also, change the Row controller identifier in the Attributes Inspector to be “LocalTimeRowController”.Screen Shot 2014-11-27 at 22.41.42
  • Create Outlets of the labels we created in the LocalTimeRowController. They will help us set the text and attributes.

Untitled

  • Since we will be showing times for multiple cities, we will need to know the timezone names for all the cities and how to refer them in the code. Fortunately this useful Gist provides what we are looking for in a nice plist.
    I have extracted out the relevant part and you can download it from here. Download the file and include the plist file into extension project.
  • Now head over to InterfaceController.swift and lets put the real logic there for populating the table. As you see, there is absolutely no code we are putting in the Watch app project. All the controlling logic code goes to the extension which is about to run in the iPhone. Implement the following method which populates the table —
      private func populateTable () {
            
            var plistKeys: NSDictionary?
            var timeZones: NSDictionary?
            
            if let path = NSBundle.mainBundle().pathForResource("Timezones", ofType: "plist") {
                plistKeys = NSDictionary(contentsOfFile: path)!
                timeZones = plistKeys!["TimeZones"] as NSDictionary?
            }
            
            if let dict = timeZones {
                table.setNumberOfRows(dict.count, withRowType: "LocalTimeRowController")
                var keyArray = dict.allKeys as [String]
                func alphabaticalSort(s1: String, s2: String) -&gt; Bool {
                    return s1 &lt; s2
                }
                
                var sortedCityNamesArray = sorted(keyArray, alphabaticalSort)
                for (index, key) in enumerate(sortedCityNamesArray) {
                    let row = table.rowControllerAtIndex(index) as LocalTimeRowController
                    row.countryLabel.setText((key as String))
                    var value: AnyObject? = dict[key as String]
                    row.localTimeLabel.setTimeZone(NSTimeZone(name: value as String))
                }
            }
        }
  •  Essentially, we are just taking all the City names (which are the keys from the plist file we included in the bundle) and displaying them in the City labels. On the other hand the values, which are name of time zones, are being used to set the time zone for the Date labels. So, each of them shows respective time for the timezones assigned to them.
  • Call the populateTable method from the init of the class.
        override init(context: AnyObject?) {
            super.init(context: context)
            populateTable()
        }
  •  Now select the executable target to be WorldWatch Watch App and run the project. Voila! You can now see through the dates of each of the cities which are being updated realtime.

You can download the whole project from Github —  https://github.com/an-indya/WorldWatch

Hope you will enjoy building for  Watch as much as I did. I will try putting in something more as I learn. Do leave a reply and feel free to share if you like!

Reference:

https://developer.apple.com/watchkit/

iOS Development

A UITableViewCell Jeopardy

A unique problem arises when a button is placed in a custom cell and on the button’s tap, the cell has to be modified or some information needs to be saved related to the cell – which necessitates that the table cell needs to be accessed. The worst way of doing this would be to call the buttons’s superview and go up in hierarchy till the cell is reached. This is worst approach because the hierarchy of cells change often as Apple modifies and improves its UITableViewController. The most common and cheapest way of doing it would be to set the button’s tag as the row index, and then on the button’s tap event, get that index from the sender (which is the button itself) and access the cell using

- (UITableViewCell *)cellForRowAtIndexPath:(NSIndexPath *)indexPath

But this is not the best of approaches.Tags are misused heavily and there might always be the risk that the tag of the button may have been set to be something else just for the sake of some other activity. There are multiple better approaches, one of them I am going to describe in this scope. The basic objective of this approach is to connect the button to the table view cell internally. We will create a delegate for the button’s press event and will implement the same in the view controller. This will have the custom cell as a parameter through which we will be able to access the cell.

Steps:

Step1: Create a delegate to handle the button’s tap in your custom cell’s .h file (CustomCell.h):

@class CustomCell;
@protocol CustomCellDelegate < NSObject >
- (void)customCellDidPressMyButton:( CustomCell *)cell;
@end
@interface CustomCell : UITableViewCell

Step 2: Create a property for the delegate, and set it weak

@property (nonatomic,weak) id < CustomCellDelegate > delegate;

Step 3: In your custom cell’s .m file (CustomCell.m) set the target action for the button and implement the selector to call the delegate method


- (void)awakeFromNib
{

[self.customButton addTarget:self
action:@selector(customButtonPressed)
forControlEvents:UIControlEventTouchUpInside];

}
- (void) customButtonPressed
{

[self.delegate customCellDidPressMyButton:self];

}


Now your custom cell is ready with the button’s delegate method to be implemented by the view controller. Here’s how to implement the same in view controller.

Step 4: Implement the delegate method:


@interface MyViewController ()< UITableViewDelegate,UITableViewDataSource, CustomCellDelegate >

- (void)customCellDidPressMyButton:(BAHPropertySearchResultCell *)cell  {

//the cell is in the parameter. Make change to it as required.

}

Step 5: Connect the table view cell with our newly appointed delegate

 
- (void)tableView:(UITableView *)tableView willDisplayCell:(UITableViewCell *)cell forRowAtIndexPath:(NSIndexPath *)indexPath
{

cell.delegate = self;

}

Step 6:  As it is important to assign the delegate, it is also important to remove the delegate when the tableview is done displaying. It can be done in the following method:


- (void)tableView:(UITableView *)tableView didEndDisplayingCell:(UITableViewCell *)cell forRowAtIndexPath:(NSIndexPath *)indexPath
{

cell.delegate = nil;

}

Hope this helps!

iOS Development

Little tricks of Accessibility

When I code, in my mind’s eye I always seem to imagine the user who is looking at or using the feature I am developing. It helps me look at my work from a more consumer driven perspective. A piece of feature, though seems not worth the time and effort, may seem indispensable from that perspective. Such a different perspective becomes of paramount importance when thinking of extending your application’s reach to people who are deprived of experiencing the world the same way as we do.
The importance of providing accessibility for differently abled people to your application can not be emphasised enough. Yes, it is extra hassle. Yes, Apple will still accept your app even if you don’t implement accessibility. And yes! the people who need accessibility are very little compared to the the large user base you are going to cater to. But — it is the right thing to do, it can change someone’s life and for your part: you may be subject to millions of silent tearful thanks and blessings from all over the world for changing so many lives in a better way. If all these do not bother you, close your eyes (imagine you are blind or nearly so) and try to access your computer, you will be bothered.

So, when it is such a great thing to do, why most of the applications don’t offer accessibility support? Why most of the applications downloaded straight from App Store just become unusable in accessibility mode? I believe what discourages people to go this extra mile is the nasty little problems that pop in when you start making your app accessible. Despite such great articles by Matt Gemmell and Mattt Thompson and other readily available examples, there are so many unique problems that arise when implementing accessibility that it really puts off the developer unless she is really a motivated person to implement it. This article ventures to dust away those nasty little problems faced by any iOS accessibility developer as much as possible.

Define: Accessibility

Accessibility is the degree to which a product, device, service, or environment is available to as many people as possible. Accessibility can be viewed as the “ability to access” and benefit from some system or entity. The concept often focuses on people with disabilities or special needs (such as the Convention on the Rights of Persons with Disabilities) and their right of access, enabling the use of assistive technology.

So what is this all about? If you have never used the iOS devices in accessibility mode it’s of utmost important for you to do it now before we move on to more complicated details:

  • Open the Settings App
  • Go to General –> Accessibility
  • Turn On the Voice Over switch

As you do that, suddenly you will find yourself in a rather inaccessible situation where none of your usual touches and gestures will behave the same way it did normally. Well, don’t fret mon ami, here are the rules of this world to get you started:

  • Tap once to select an item
  • Double-Tap to activate the selected item
  • Swipe with three fingers to scroll

Also, if you do a single finger swipe, the focus of the voice over will shift from one element to another sequentially. When you will be testing accessibility in the device, you will need to quickly switch ON and OFF this mode and there is a shortcut with which you can do that:
In the Settings app —

  • Go to General → Accessibility and
  • Scroll down to the bottom of the screen and tap on the button “Accessibility Shortcut”
  • And check the “Voice Over” option from the next screen
  • Now, triple press the Home button of the iOS device — VoiceOver turns on. At any point of time, you can triple press the Home button to turn it off.

The accessibility can also be tested in iPhone Simulators and the accessibility inspector can be enabled in the “Settings” app in the simulator.

Is it hard to implement?

Despite of the fact that there are several great articles which offer interesting insight into Accessibility on iOS devices, they often seem to oversimplify the hassle of implementing VoiceOver and other accessibility methods, I guess, to liberate you of the fear of  going the extra mile to implement accessibility. Honestly, they are partially true. Here is a quote from Matt Gemmell’s blog which is arguably the best accessibility article existing on the web. he says as below:

The good news is that it’s incredibly easy to add accessibility support to your application (there’s no bad news, incidentally). The reality of adding accessibility support to your app is that:

  1. About 80% of your app is probably accessible already, via the built-in VoiceOver support in UIKit.
  2. You can probably boost that to around 95% simply by spending a few minutes in Interface Builder, without writing a single line of code.
  3. And you can very likely reach 100% accessibility support via implementing some incredibly trivial methods, which will also take you just a few minutes.

Well, not so fast.

For a complex enterprise level application which offers accessibility, making the application compliant to the Disability Discrimination Act and similar ones may become a project in itself. But, no, it is definitely not rocket science. It just demands a little determination, clarity of thought and industry. So, what holds you up? As I told you before, the nasty little problems. What are they?

Problems

Background items are visible.

Accessibility has a bad habit of revealing what’s underneath the curtain. Technically, that means when you add a subview over a view and there are elements that are under your new view, they also get focussed and announced


for (UIView *view in [self.view subviews]){
[view setAccessibilityElementsHidden:YES];
}

There are 2 methods that can be called on a view to render that particular view element inaccessible:

  • isAccessibleElement
  • setAccessibilityElementsHidden

The good thing about the later one is that when it hides one element, it hides the subviews too. This can prove really helpful in the scenario where you have a got a pretty deep view hierarchy.

The single finger swipe is not selecting items on the screen in order

Well, this can prove to be a real nasty one sometimes, because the accessibility switches its focus in the sequence in which the views are laid out in the interface builder and it is not always possible to alter the hierarchy. Apple has suggested a really great and powerful approach. Follow the below steps to dodge the bullet:

  1. Create a subclass of UIView and assign that class to your view in the Interface Builder
  2. In the subclass, over ride the accessibleElements setter
  3. Add the elements of your choice in your preferred order in the array and return it
  4. Implement the UIAccessibilityContainer protocol methods

So, the code sums up to the following (followed Apple’s documentation)


@implementation MultiFacetedView
- (NSArray *)accessibleElements
{
if ( _accessibleElements != nil )
{
return _accessibleElements;
}
_accessibleElements = [[NSMutableArray alloc] init];

Create an accessibility element to represent the first contained element and initialize it as a component of MultiFacetedView.


UIAccessibilityElement *element1 = [[[UIAccessibilityElement alloc]     initWithAccessibilityContainer:self] autorelease];

/* Set attributes of the first contained element here. */
[_accessibleElements addObject:element1];

/* Perform similar steps for the second contained element. */
UIAccessibilityElement *element2 = [[[UIAccessibilityElement alloc]     initWithAccessibilityContainer:self] autorelease];

/* Set attributes of the second contained element here. */
[_accessibleElements addObject:element2];

return _accessibleElements;
}

The container itself is not accessible, so MultiFacetedView should return NO in isAccessiblityElement


- (BOOL)isAccessibilityElement
{
return NO;
}

The following methods are implementations of UIAccessibilityContainer protocol methods


- (NSInteger)accessibilityElementCount
{
return [[self accessibleElements] count];
}

- (id)accessibilityElementAtIndex:(NSInteger)index
{
return [[self accessibleElements] objectAtIndex:index];
}

- (NSInteger)indexOfAccessibilityElement:(id)element
{
return [[self accessibleElements] indexOfObject:element];
}

@end

Instead of creating the UIAccessibilityElements, the view elements can also be passed into the array which works absolutely fine.

Some Important Notes

  1. When designing the user interface of the application, it is very important to take into account the people who are colour blind. So, to depict the different state of an element with different colours may not be the wisest of choices
  2. For non trivial controls, it is really important to let the user know what it does or how to operate it. For example, if you have created this super cool knob which can be rotated to select different options, it would be really necessary for the voice over to announce that clearly
  3. If you have a hyperlink in the application, which takes the user outside the application, it is of utmost important to make the user aware of the fact in voiceover
  4. As the user taps a control if some change happens to the screen, be it very minimal, the user would love to know about that. So, if because the user entered a great password in the password input textfield whilst creating an account, the “SignUp” button gets enabled, it is important to let the user know that the button got enabled
  5. Ensure that the elements that are hidden are not announced as this will create confusion for the user

Conclusion

I have noted down everything I have experienced while working with accessibility for iOS. I will continue to add to this article any new learnings as and when I encounter it. If you liked this article, let me know by posting a comment. Hope this helped!

iOS Development

Difference between #import and #include


The following post is actually a repost from StackOverflow. The answer of the question is scattered in so many places, it’s really hard to get a proper answer. This is my respect to the person who posted the answer (however, was not selected to be the best answer, sadly).

There seems to be a lot of confusion regarding the preprocessor.

What the compiler does when it sees a #include that it replaces that line with the contents of the included files, no questions asked.

So if you have a file a.h with this contents:

typedef int my_number;

and a file b.c with this content:

#include "a.h"
#include "a.h"

the file b.c will be translated by the preprocessor before compilation to

typedef int my_number;

which will result in a compiler error, since the type my_number is defined twice. Even though the definition is the same this is not allowed by the C language.

Since a header often is used in more than one place include guards usually are used in C. This looks like this:

 #ifndef _a_h_included_
 #define _a_h_included_

 typedef int my_number;

 #endif

The file b.c still would have the whole contents of the header in it twice after being preprocessed. But the second instance would be ignored since the macro _a_h_included_ would already have been defined.

This works really well, but has two drawbacks. First of all the include guards have to be written, and the macro name has to be different in every header. And secondly the compiler has still to look for the header file and read it as often as it is included.

Objective-C has the #import preprocessor instruction (it also can be used for C and C++ code with some compilers and options). This does almost the same as #include, but it also notes internally which file has already been included. The #import line is only replaced by the contents of the named file for the first time it is encountered. Every time after that it is just ignored.


Source:

http://stackoverflow.com/questions/439662/what-is-the-difference-between-import-and-include-in-objective-c