As a continuation to the series of articles I have been writing about Apple Watch and WatchKit (which you can find here and here), today I intend to discuss about the “Glance” feature of Apple Watch. But as Christmas is drawing near, and Mr. Clause would like me to do so, in addition to Glance, I’ll give you something extra. Very recently, Apple has revealed a new feature to WatchKit. The feature is inter device communication, which bridges the information gap between the iPhone device and Apple Watch. I’ll cover that too!
So, as an aggregation measure and in the urge to know everything right now and here, which is an instance of an insatiable inquisitiveness inherent in invariably all individuals such as I, this article enjoys the daylight.
Glances
Glances are a summary view of the actual application running in the Apple Watch. You can very well compare them with the live tiles in Windows Phone. In Apple’s own words —
Glances are a browsable collection of timely and contextually relevant moments from the wearer’s favorite apps. Individually, a Glance is a quick view of your app’s most important content.
Keeping that intention in mind, Apple has put severe restrictions to the design of Glances. The first of them is —
- Template Based: they are template based. So, there is no way other than following where Apple wants you to put your views.
- Single Action: Another one is, they only can host one single action. If the user taps on the Glance, the Watch App launches.
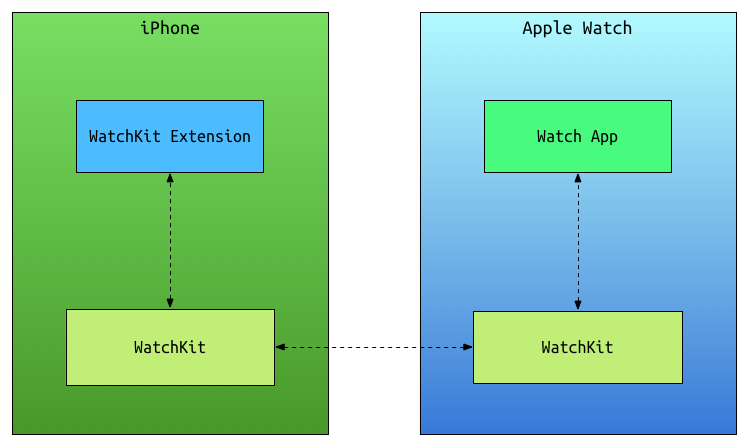
Inter Device Communication
It would have been really good if the communication was really two way, in an impartial manner. Unfortunately, iPhone turned out to be too shy to start the conversation with Apple Watch. And in such a scenario, Apple Watch does just what a guy/girl does when trying his/her luck with their shy counterpart, it takes the initiative and approaches. Hopefully, if s/he wishes to do so, iPhone can reply back. Romantic, isn’t it?
How to Glance (and not watch!)
Today, I will not delve deep into step by step tutorials. Because, making an Apple Watch app with Glances is really easy and only takes a heartfelt tick on the tick box that says “Include Glance Scene”.

I will rather explain what I want to present to you in terms of source code, which as usual is uploaded in Github (MIT license).
Application Overview (my big idea)
My idea of utilising both Glance and Inter Device Communication is as follows:
Let me tell you a secret, I love loans. There is no other thing in the world that has such a tremendous power to provide you endless sleepless nights (for two) and at an extreme, even the unique opportunity to be homeless again, only at the nominal cost of a little temporary happiness! That’s why, I would like to make a banking app which lets you view your loan balance, and unlike other selfish banks, encourages you to pay back the loan and be out of that debt soon (so that you can borrow an even larger amount soon enough!)
The original iPhone application shows your loan account number and a pie chart that depicts how much you have paid back and how much outstanding amount you have to pay further.

This information will also be available in my Apple Watch app. In the Glances view, the user can see the graph in the iPhone app which urges her to make the whole green.

And here will be the Glance view for the data.

The graph is generated using the famed CorePlot. Apple Watch unfortunately does not have the guts to use CorePlot yet, so it will have to suffice with a PNG representation of the graph view which will be thrown to the Watch App upon request.
iPhone App – with all her beauty, waits for her knight in shining armour
Our iPhone application has a JSON file, which contains the following data. Of course In the real life scenario all these data would be coming from the server locked in encryptions with keys thrown in the water.
   {
      "LoanAmount": "70000",
      "Outstanding": "20000",
      "Paid": "50000",
      "AccountNo" : "3423847289",
      "NextInstallment": "01/01/2015"
    }
The iPhone app reads the data and generates the pie chart using core plot API. Finally the graph is converted into png image and is saved in the document directory.
What Apple (Knight) Watch does
The Apple Watch have the ability to invoke the parent app. So, when the user taps on the “Refresh” button, the iPhone app launches and generates the graph.
- (IBAction)refreshGlance {
    [self openParentAppToRefreshGraph];
}

-(void) openParentAppToRefreshGraph {
    [WKInterfaceController openParentApplication:[NSDictionary dictionaryWithObjectsAndKeys:@"ImageName", @"chartImage.png", nil] reply:^(NSDictionary *replyInfo, NSError *error) {
        NSData *pngData = replyInfo[@"Image"];
        NSArray *paths = NSSearchPathForDirectoriesInDomains(NSDocumentDirectory, NSUserDomainMask, YES);
        NSString *documentsPath = [paths objectAtIndex:0]; //Get the docs directory
        NSString *filePath = [documentsPath stringByAppendingPathComponent:@"chartImage.png"]; //Add the file name
        [pngData writeToFile:filePath atomically:YES];
    }];
}
Her silent reply…
In the callback to the Apple Watch, the image generated from the graph is sent back to the Apple Watch for display.
    // Called when the application is about to terminate. Save data if appropriate. See also applicationDidEnterBackground:.
}

-(void)application:(UIApplication *)application handleWatchKitExtensionRequest:(NSDictionary *)userInfo reply:(void (^)(NSDictionary *))reply {

    [[NSNotificationCenter defaultCenter] postNotificationName:@"WatchKitNotification" object:nil];

    NSArray *paths = NSSearchPathForDirectoriesInDomains(NSDocumentDirectory, NSUserDomainMask, YES);
    NSString *documentsPath = [paths objectAtIndex:0]; //Get the docs directory
    NSString *filePath = [documentsPath stringByAppendingPathComponent:@"chartImage.png"];
    NSData *pngData = [NSData dataWithContentsOfFile:filePath];

    NSDictionary *response = @{@"Image" : pngData};
    reply(response);

}
Phew!… It’s a Yes !!
Once the data is received, Apple Watch then saves the image in the documents directory. So, when user goes to glance, the new updated graph is ready.
- (void)awakeWithContext:(id)context {
    [super awakeWithContext:context];

    NSArray *paths = NSSearchPathForDirectoriesInDomains(NSDocumentDirectory, NSUserDomainMask, YES);
    NSString *documentsPath = [paths objectAtIndex:0]; //Get the docs directory
    NSString *filePath = [documentsPath stringByAppendingPathComponent:@"chartImage.png"];
    NSData *pngData = [NSData dataWithContentsOfFile:filePath];
    [self.glanceImage setImageData:pngData];
}
Conclusion
And the Apple Watch and iPhone lived happily ever after (for many many years).
Hope you liked the story. The code is uploaded in Github, you can grab it here. You’re welcome! 🙂
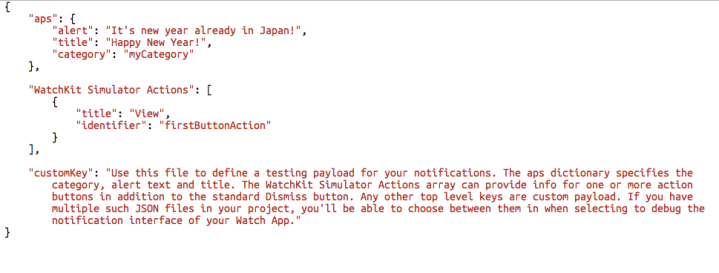 Changing the alert, title and category controls what the notification screen will display.